
FFMPEG Conversion
Somtimes you have a source video that will not work properly with Premiere Pro - for example a BluRay disc turned into an mkv file using MakeMKV - this tutorial will walk you through using a free open-source program to convert your videos if you need to do so. Please make sure you have enough space before using ffmpeg, any video you try to convert will create a fresh fixed copy of the same size as the original.
Program Setup
Download ffmpeg and unzip it to a convenient location, this tutorial is going to use C:\ffmpeg\ as the example location. For tutorial simplicity we provide a 2023 version of ffmpeg to get you started, but feel free to get a newer version from their website if you want it.
Optional: You can also add the ffmpeg bin path to your Environmental Variables if you want to make the commands shorter. If you don't know what that means don't worry about it for now, the commands below will work without doing this optional step.
I'd also recommend installing VLC if you don't have it already - it's a good video player and a convenient way to check what type of file you're trying to convert.
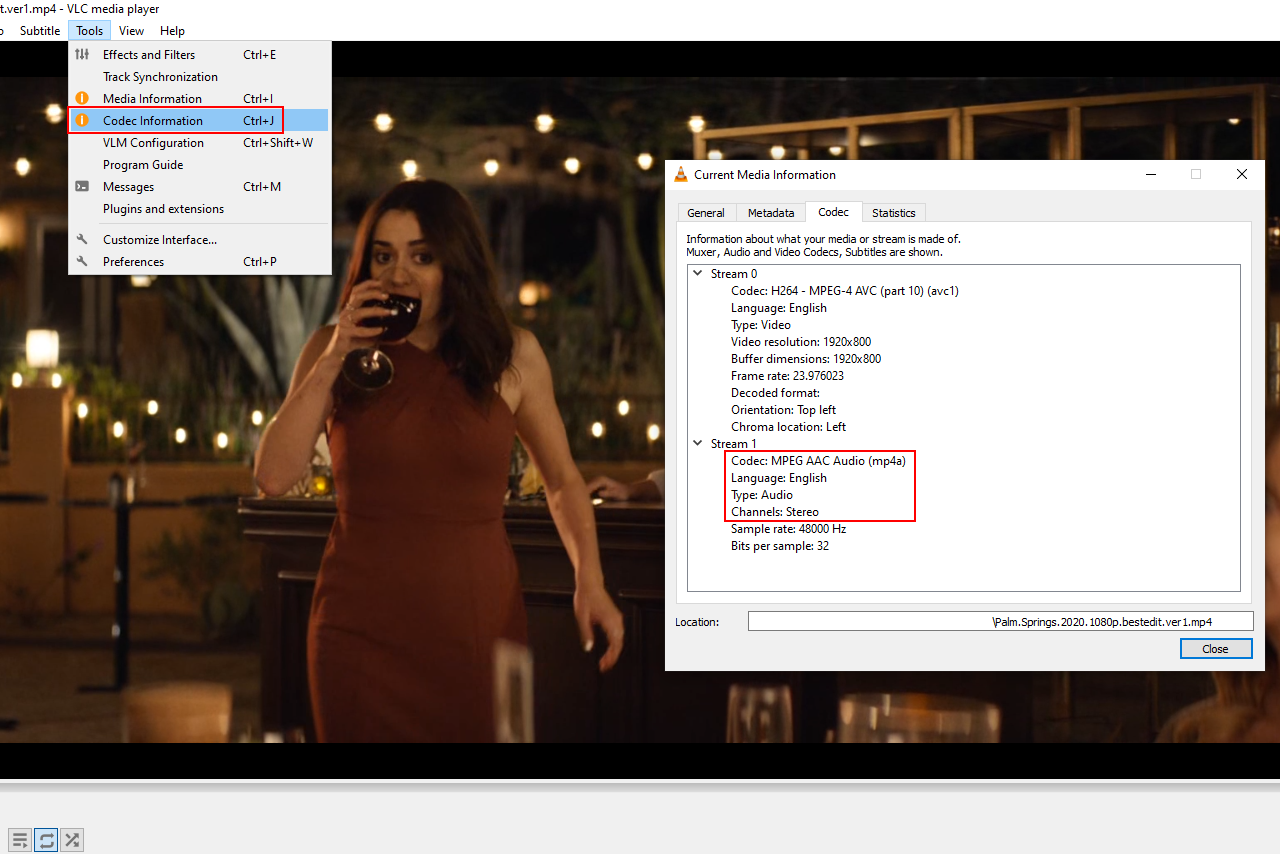
1. Determine what type of encoding your video file has - playing the video in VLC and using the Tools > Codec Information screen is the easiest way to check this.
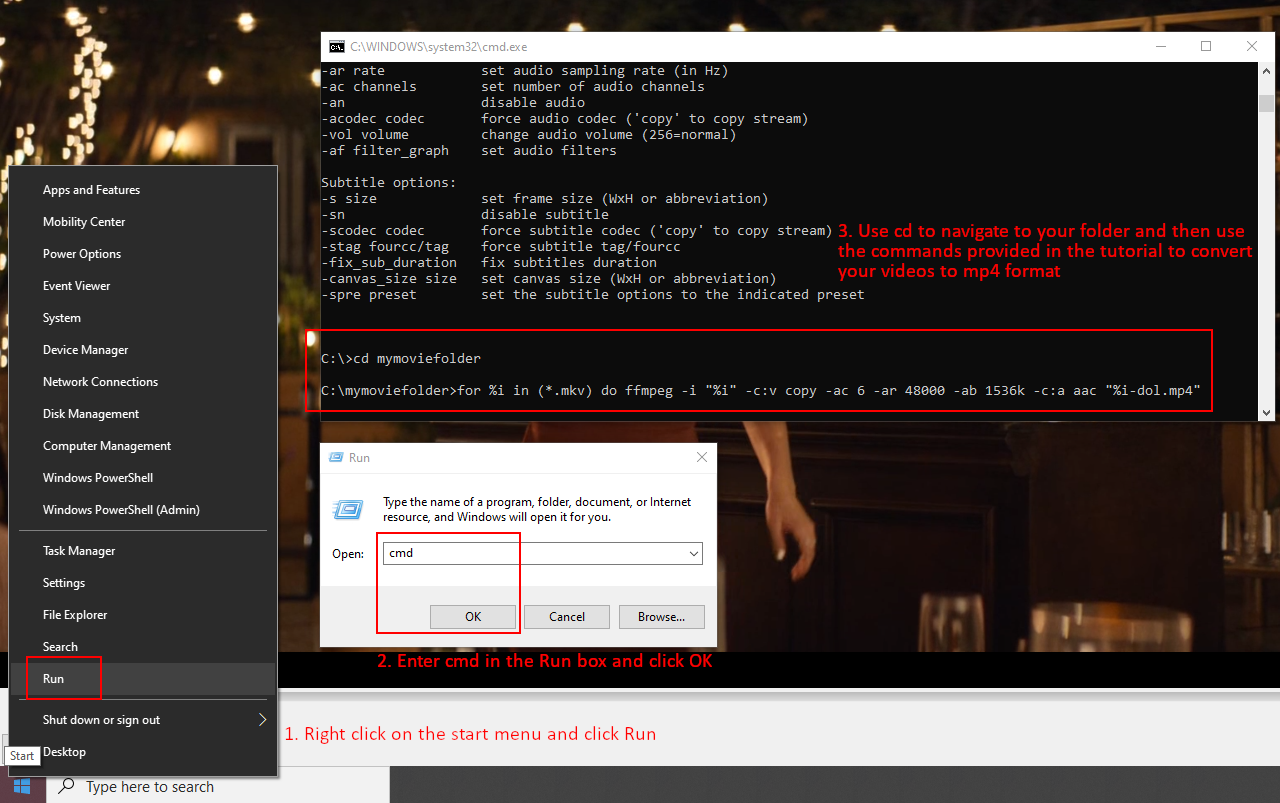
2. Open a command window and use an appropriate command to convert the file to a compatible MP4 using ffmpeg. Some commands are listed below for different scenarios. For each command there are two versions, one if you just want to do an individual file, and a second command you can use if you need to convert an entire folder of videos at once.
If the audio codec is a Stereo AAC you probably just want to do a quick copy to change your file from mkv to mp4. But if it's something more complicated like an DTS Audio codec with 3F2M channels (dolby), then I generally opt to do a full conversion just to be safe. If you aren't sure you can try the quick copy command first and do the full copy if the quick one doesn't make it work in Premiere.
Once ffmpeg finishes converting the data you should be able to use your fresh new MP4 file with Adobe Premiere with no issues!
Quick copy: This command runs very fast and just copies your file from mkv to mp4 format. If you're not sure if your codecs work properly with Premiere you may want to try this command first since the other takes much longer to run.
Single file command: C:\ffmpeg\bin\ffmpeg.exe -i "YOURMOVIENAME.mkv" -codec copy "NEWMOVIENAME.mp4"
Whole folder command: for %i in (*.mkv) do C:\ffmpeg\bin\ffmpeg.exe -i "%i" -codec copy "%i.mp4"
Single file command: C:\ffmpeg\bin\ffmpeg.exe -i "YOURMOVIENAME.mkv" -codec copy "NEWMOVIENAME.mp4"
Whole folder command: for %i in (*.mkv) do C:\ffmpeg\bin\ffmpeg.exe -i "%i" -codec copy "%i.mp4"
Fully convert audio: This command runs a conversion on the audio, changing it to Dolby 5.1 AAC which works well with Premiere. Be aware that this can take 30-60 minutes to run depending on the length of your video and the speed of your computer!
Single file command: C:\ffmpeg\bin\ffmpeg.exe -i "YOURMOVIENAME.mkv" -c:v copy -ac 6 -ar 48000 -ab 1536k -c:a aac "NEWMOVIENAME-dol5.mp4"
Whole folder command: for %i in (*.mkv) do C:\ffmpeg\bin\ffmpeg.exe -i "%i" -c:v copy -ac 6 -ar 48000 -ab 1536k -c:a aac "%i-dol5.mp4"
Single file command: C:\ffmpeg\bin\ffmpeg.exe -i "YOURMOVIENAME.mkv" -c:v copy -ac 6 -ar 48000 -ab 1536k -c:a aac "NEWMOVIENAME-dol5.mp4"
Whole folder command: for %i in (*.mkv) do C:\ffmpeg\bin\ffmpeg.exe -i "%i" -c:v copy -ac 6 -ar 48000 -ab 1536k -c:a aac "%i-dol5.mp4"
High quality audio (advanced users only!):
Aside from the notes below, there's also a video of the Encoding Tutorial that helps explain/show the process of using high-quality files further. This is complicated and meant for advanced users - the MP4's above will give you a good starting place if you're a novice to fanediting!
There's one final option - if you want audio that's highly precise you can use PCM instead of AAC - you have to change the container to a MOV file since MP4 doesn't support high precision audio. Beware that this will be significantly larger than the MP4, however the tradeoff is that the MP4 audio is often half a frame off from the video sync-wise. Most people may not notice this but it bothers me, so I choose to use more space and a bit more effort to get a better sync.
This 5.1 audio is treated as 6 mono tracks by Premiere, so be sure to right click your video file in the project pane and go to Modify > Audio Channels to properly map it as 5.1 audio before you start editing, since you typically won't want to edit the audio as 6 separate tracks! (proper settings are Format: 5.1, Number of audio Clips: 1, and 6 checkmarks in a diagonal line from the top left to the bottom right)
IMPORTANT: However there is one further complication - Adobe Premiere is very picky about how the video is encoded in MOV files! Both the audio AND video must be a constant bit rate - you can use a program called Mediainfo to examine your files and see the attributes. The audio will always be a constant bit rate since we're converting it, so we don't care about those settings, but for the OVERALL bit rate to be constant, we need the video to be constant as well. Unfortunately Bluray often use variable bit rate video. Don't confuse constant frame rate with constant bit rate when inspecting a file in Mediainfo, the bit rate mode is the one that matters.
... So if we have a "Bit rate mode: Variable" in the video section, then we also have to re-encode the video, we can't just copy it (well, you could, but Premiere would be a buggy nightmare to edit your file). Below I've given you two options, one for if your video bitrate is already constant in your mkv file. The other option is a nearly lossless copy of the video, converting it to constant bitrate so that it plays nice with Premiere.
For MKV files that already have constant bit rate video:
Single file command: C:\ffmpeg\bin\ffmpeg.exe -i "YOURMOVIENAME.mkv" -c:v copy -ac 6 -ar 48000 -ab 1536k -c:a pcm_s16le "NEWMOVIENAME-dol5pcm.mov"
Whole folder command: for %i in (*.mkv) do C:\ffmpeg\bin\ffmpeg.exe -i "%i" -c:v copy -ac 6 -ar 48000 -ab 1536k -c:a pcm_s16le "%i-dolpcm.mov"
For MKV files that have variable bit rate video and audio incompatible with Premiere (this will take much longer and probably 2x the disk space your original mkv did, when using the veryslow setting. Note you can also replace veryslow in this command with ultrafast instead, which will encode 2-3x faster but also take 5x the space as your original mkv, so unless you have a large drive or are deleting the MOV files after your edit, it's probably wise to let it take longer for the smaller file):
Single file command: C:\ffmpeg\bin\ffmpeg.exe -i "YOURMOVIENAME.mkv" -c:v libx264 -preset veryslow -qp 0 -ac 6 -ar 48000 -ab 1536k -c:a pcm_s16le "NEWMOVIENAME-dol5pcmQP0.mov"
Whole folder command: for %i in (*.mkv) do C:\ffmpeg\bin\ffmpeg.exe -i "%i" -c:v libx264 -preset veryslow -qp 0 -ac 6 -ar 48000 -ab 1536k -c:a pcm_s16le "%i-dol5pcmQP0.mov"
For MKV files that have variable bit rate video and audio compatible with Premiere (AC3) (this will take much longer and probably 2x the disk space your original mkv did, when using the veryslow setting. Note you can also replace veryslow in this command with ultrafast instead, which will encode 2-3x faster but also take 5x the space as your original mkv, so unless you have a large drive or are deleting the MOV files after your edit, it's probably wise to let it take longer for the smaller file):
Single file command: C:\ffmpeg\bin\ffmpeg.exe -i "YOURMOVIENAME.mkv" -c:v libx264 -preset veryslow -qp 0 -c:a copy -ac 6 "NEWMOVIENAME-dol5ac3QP0.mp4"
Whole folder command: for %i in (*.mkv) do C:\ffmpeg\bin\ffmpeg.exe -i "%i" -c:v libx264 -preset veryslow -qp 0 -c:a copy -ac 6 "%i-dol5ac3QP0.mp4"